
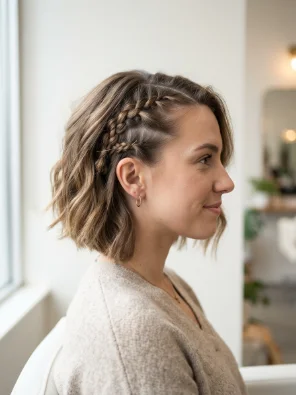
You may want a braided hairstyle without braiding your whole head. You may also want to keep most of your hair loose, curly, straight, or tied back.
A side part with braids on the side gives you both options. The side part creates a clear shape, while the braids add detail near the temple. The loose section can stay natural or be styled to fit the occasion.
Still, the right braid size and placement matter. Thick braids can take over the style. Tight braids can make your hairline feel sore. Short hair may also need pins because the braid ends will not reach very far.
The ideas below include simple mini braids, cornrows, formal updos, ponytails, and bold faux undercuts. You will also learn how to choose a style for your hair type, create a clean side part, and keep the braids comfortable.
Side-Swept Knotless Braids

Knotless braids can be installed with a clear side part so most of the braids fall over one shoulder. Smaller braids near the part help the front sit more smoothly.
The side-swept look can frame your face and show the braid length. Curled ends can make the style feel softer.
Do not leave the full weight of the braids pulling against one side for long periods. Switch the placement when your hairline needs a break.
Best for: Long braided styles
Braid skill: Professional or experienced
Loose-hair finish: Braids swept over one shoulder
Styling tip: Keep the braids near the hairline light and comfortable.
Side Part With Two Small Cornrows

Two small cornrows create more detail while keeping most of your hair free. Make a deep side part, then divide the smaller side into two even sections.
Braid both sections in the same direction. You can stop the braids near the ear or continue them farther back.
Keep the spacing even so the finished style looks clean. Pair the braids with loose curls for contrast or straight hair for a sleek finish.
Best for: Medium or long hair
Braid skill: Intermediate
Loose-hair finish: Curls, waves, or straight hair
Styling tip: Use the pointed end of a rat-tail comb for cleaner sections.
Side Part With Three Mini Braids

Three mini braids are easier than cornrows because you can use a basic three-strand method. Create small sections near the temple and braid each one away from your face.
Secure the ends with clear elastics or pin them behind your ear. Keep the braids thin so they do not look heavy against fine hair.
This style is useful when you want detail but cannot braid close to the scalp.
Best for: Fine, straight, or lightly wavy hair
Braid skill: Beginner
Loose-hair finish: Natural texture or soft waves
Styling tip: Use small elastics that do not catch or pull the hair.
Side Part With Stitch Braids

Stitch braids use small, clean sections to form visible lines across each braid. The pattern adds detail even when the braids are narrow.
Create two or three stitch braids on the smaller side of the part. Pair them with loose curls, straight hair, or a low ponytail.
This style needs careful sectioning. Use a comb instead of your fingernails to form the small lines.
Best for: Coily or textured hair
Braid skill: Advanced
Loose-hair finish: Sleek, curly, or tied back
Styling tip: Use only enough gel to keep the sections clean.
Side Part With Feed-In Braids
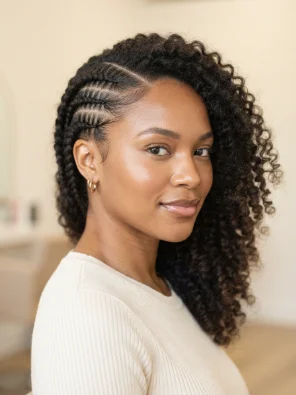
Feed-in braids begin small and become thicker as extra hair is added. Use two or three narrow braids on the smaller side of your part.
The gradual size change gives the front a smooth finish. It can also reduce the large knot that may form when all the extension hair is added at once.
Keep the added hair light near the temples. Too much weight in a small section may feel uncomfortable.
Best for: Curly, coily, or textured hair
Braid skill: Advanced or professional
Loose-hair finish: Curls, a ponytail, or a full loose section
Styling tip: Ask for gentle tension around the front hairline.
Side Part With Braids and Loose Waves

One or two small braids can make loose waves look more finished. Place them beside a deep side part and hide the ends beneath the wavy section.
This style works well for dinners, parties, weddings, or photo days. It feels polished without looking too formal.
Create the braids before curling the rest of your hair. This keeps hot tools away from the small braided sections.
Best for: Medium or long hair
Braid skill: Beginner to intermediate
Loose-hair finish: Soft waves
Styling tip: Use a small pin to hide each braid end beneath the waves.
Side Part With Braids and a Low Bun

A low bun gives side braids a more formal finish. Start with a deep side part, then braid the smaller section back.
Gather the rest of your hair near the nape and form a bun. Keep it smooth for a polished look or loosen a few pieces for a softer style.
This option works well for weddings, dinners, work events, and formal photos.
Best for: Medium or long hair
Braid skill: Intermediate
Loose-hair finish: Smooth or soft low bun
Styling tip: Choose pins that match your hair so they stay hidden.
Side Part Braided Ponytail

A braided ponytail keeps your hair controlled while adding detail near the front. Create one or more braids along the smaller side of your part.
Secure the braids first. Then gather all your hair into a high, middle, or low ponytail.
You can leave a few soft pieces around the face or keep the front smooth. Wrap a small section of hair around the ponytail elastic for a cleaner finish.
Best for: School, work, workouts, and busy days
Braid skill: Beginner to intermediate
Loose-hair finish: High or low ponytail
Styling tip: Finish the side braids before forming the ponytail.
Side Braids With Sleek Straight Hair

This style combines narrow side braids with smooth, straight hair. Make a clean side part and braid the smaller section close to the head.
Straighten the loose section after applying heat protection. Keep the roots smooth so the contrast between the braid and loose hair stays clear.
Avoid placing heavy oil near the braid. Too much product can make the roots look flat or greasy.
Best for: Straight or heat-styled hair
Braid skill: Intermediate
Loose-hair finish: Sleek and straight
Styling tip: Finish with a light shine spray instead of thick oil.
Side Braids With Beads or Hair Cuffs

Beads, rings, and cuffs can make narrow side braids easier to see. Start with one, two, or three braids, then add accessories after they are secure.
Choose a few lightweight pieces. Too many heavy accessories may pull on the small sections near your temple.
Gold cuffs can suit a festival style. Pearls can work with a low bun, while clear elastics keep the look simple.
Best for: Parties, festivals, and statement styles
Braid skill: Beginner to intermediate
Loose-hair finish: Curls, waves, ponytail, or bun
Styling tip: Space the accessories apart so the braid pattern stays visible.
Side Braids for a Bob or Short Hair

Short hair can still hold side braids. The braid simply needs to be smaller and placed closer to the temple.
Create one or two mini braids and stop behind the ear. Use bobby pins if the ends are too short for an elastic.
Light waves on the loose side can add shape and keep the hairstyle from looking flat. Cross two pins over each other if one pin does not hold the braid.
Best for: Bobs, lobs, and short layered hair
Braid skill: Beginner
Loose-hair finish: Light waves or natural texture
Styling tip: Hide the crossed pins beneath the top layer of hair.
French Braid Along a Deep Side Part

A French side braid creates a soft line beside the part. Start near the front hairline and add small sections as you braid back.
Keep the braid on the smaller side of the part. Stop near the ear and pin the end beneath the loose hair.
A loose French braid feels more relaxed than a tight cornrow. You can gently pull the outer loops to make it look fuller.
Best for: Medium or long hair
Braid skill: Intermediate
Loose-hair finish: Soft curls or loose waves
Styling tip: Add small sections so the braid stays neat and balanced.
Dutch Side Braid With Loose Hair

A Dutch braid sits above the hair because the sections cross underneath each other. This makes the braid stand out more than a French braid.
Place it along the smaller side of a deep part. Keep the opposite side loose and full to balance the raised braid.
This style works well on thick hair because the braid has enough volume to stay visible. Fine hair may need texture spray for extra grip.
Best for: Medium or thick hair
Braid skill: Intermediate
Loose-hair finish: Full curls or waves
Styling tip: Begin with small sections near the hairline for better control.
Deep Side Part With One Cornrow

One slim cornrow is a good place to start if you do not want a complex style. Create a deep side part above one eyebrow. Braid the smaller section from the front hairline to the area behind your ear.
Leave the larger section loose. You can wear it straight, curly, or wavy.
A narrow braid looks like a small accent instead of taking over the hairstyle. It can also help keep short pieces away from your face.
Best for: Beginners and medium to long hair
Braid skill: Beginner
Loose-hair finish: Straight, wavy, or curly
Styling tip: Clip the loose section away before you start braiding.
Braided Faux Undercut With Curls

A braided faux undercut gives you the look of a shaved side without removing any hair. Several close cornrows keep one side flat, while the other side stays full.
Defined curls create a strong contrast with the braided section. Sweep most of the loose hair across the opposite side of your head.
The braids should sit close to the scalp, but they should not hurt. A sore hairline is not part of the style.
Best for: Thick, curly, or coily hair
Braid skill: Intermediate to advanced
Loose-hair finish: Defined curls with side volume
Styling tip: Direct the loose hair across the unbraided side for balance.
Which Side Braid Works Best for Your Hair Type?
The same braided side part hairstyle can look different on fine, thick, straight, or curly hair. Your braid size should match the amount of hair in the section.
Fine Hair Needs Small, Light Braids
Fine hair often works well with one cornrow, mini braids, or a soft French braid. Keep each section small so the braid does not overpower the loose hair.
Avoid heavy extensions near the temple. They may add more weight than the section can support.
A little mousse or texture spray can give straight, fine hair more grip.
Thick Hair Can Hold Larger Patterns
Thick hair can support Dutch braids, several cornrows, and faux undercut styles. Clear parting helps control the extra volume.
You may need larger sections, but avoid making the braids too bulky. The loose side should still balance the braided section.
Straight Hair May Need More Grip
Straight hair can slip while you braid it. Add a small amount of mousse, dry texture spray, or light braid gel before starting.
Mini braids, French braids, and sleek cornrows often work well. Keep the product light so the roots do not look greasy.
Wavy Hair Blends Well With Soft Braids
Waves pair naturally with relaxed French braids, small cornrows, and pinned mini braids.
Do not brush out the whole wave pattern before braiding. Detangle only the section you plan to use.
Curly and Coily Hair Supports Close Braids
Cornrows, stitch braids, feed-in braids, and faux undercuts can work well on curly or coily hair.
Think about shrinkage when leaving part of the hair loose. The finished length may look shorter after the curls dry.
Short Hair Needs Pins and Smaller Sections
Side braids for short hair should stay close to the temple. Stop them behind the ear and secure the ends with pins.
Very short layers may slip out. Light gel can help, but do not force every tiny edge hair into the braid.
How to Create a Clean Side Part With Braids
Create and check the part before you add gel or begin braiding. This gives you time to move it if the placement feels wrong.
A deep side part usually begins above the outer part of one eyebrow. However, you can move it slightly to work with your natural growth pattern.
Follow these steps:
- Detangle your hair from the ends to the roots.
- Use a rat-tail comb to create the side part.
- Clip the larger section out of the way.
- Divide the smaller side into one, two, or three sections.
- Add a small amount of mousse or braid gel.
- Braid each section in the direction you want it to sit.
- Secure the ends without pulling them too tight.
- Style the loose part of your hair.
- Smooth flyaways with light mousse or hairspray.
Your part does not have to be perfectly straight. A curved or diagonal line may follow your head shape better.
Braid in the same direction that the hair will rest. Pulling a braid too far back can make the front lift or place pressure on the temple.
Check the front and side in a mirror. Use a second mirror to see the back.
Common Mistakes to Avoid
- Starting with tangled hair
- Making very uneven sections
- Using too much gel
- Pulling the braid too hard
- Styling the loose hair before finishing the braids
- Using elastics that catch or break the hair
- Forcing short edge hairs into the braid
How to Match Side Braids to Your Face and Occasion
The braid is one part of the finished shape. The loose section creates most of the volume and movement.
A deep side part creates a strong diagonal line. This can make a round face appear slightly longer, especially when the loose hair has some height at the crown.
For a square face, try soft waves and a relaxed braid. Loose pieces around the face can make the overall shape feel less sharp.
A long face may suit a softer side part instead of a very deep one. Add width with loose curls or waves rather than placing all the volume at the crown.
For a heart-shaped face, side braids with curls can balance the wider forehead and narrower chin.
Oval faces can work with many braid placements. Choose the position based on your texture and the finish you like.
The event also matters.
For school or casual days, try mini braids or one cornrow. A braided ponytail works well for workouts and busy mornings.
For work, choose a smooth side braid leading into a low ponytail or bun. Keep the accessories simple.
For weddings or dinners, pair the braid with soft waves or a polished low bun.
A faux undercut with cuffs creates a bolder festival or party look.
How to Keep Side Braids Neat Without Hurting Your Edges
Neat braids should feel secure, but they should not cause pain.
Do not pull small edge hairs hard just to make the section look cleaner. You can leave short or weak hairs outside the braid and smooth them gently.
Use light tension near the temples. This area often has finer hair than the rest of the head.
Be careful with extension hair. A small section near the front should not carry a large amount of added weight.
Signs that a braid may be too tight include:
- Pain during or after styling
- A pulling headache
- Small bumps near the hairline
- Skin that looks stretched
- Soreness that continues the next day
Loosen or remove the braid if it keeps hurting. Ongoing scalp pain or hair loss should be checked by a qualified professional.
At night, cover the braided side with a satin scarf or bonnet. This can help reduce rubbing and keep small hairs from lifting.
Use a little mousse when the braids need smoothing. Adding more gel every day can cause buildup.
Remove the style slowly. Undo each braid from the end and work upward. Do not pull through knots or rip out small elastics.
5 Simple Accessories That Make Side Braids Stand Out
You do not need many accessories to make side braids more visible. One or two small details are often enough.
1. Metallic Cuffs
Add a few gold or silver cuffs to narrow cornrows. Space them apart so the braid remains visible.
2. Pearl Pins
Pearl pins work well with side braids and a low bun. Place them near the back rather than directly on weak edge hairs.
3. Clear or Colored Elastics
Clear elastics create a simple finish. Colored elastics can make mini braids feel more playful.
4. Small Beads or Rings
Use light beads or thin rings on selected braids. Avoid loading every section with heavy pieces.
5. Ribbon
A thin ribbon can be woven into a French or Dutch side braid. Choose a soft ribbon that will not catch the hair.
Add accessories after the braid is secure. They should feel light and stay in place without pulling.
Choose a Side Braid That Fits Your Hair
The finished style depends on your part placement, braid size, hair texture, and loose-hair finish. Comfort matters too. Your braids should stay secure without causing pain around your edges.
Save two or three ideas that match your hair length and braid skill. Beginners can start with one mini braid before trying cornrows or feed-in styles.
The best side part with braids on the side should look good and feel easy to wear. Start simple, then add more detail when you feel ready.
